Member-only story
How to Rename an Xcode Project Without Losing Your Mind

I was recently working on an iOS app when I found myself in need of renaming my project. This can be useful if you ever need to make a copy of one of your projects to serve as a basis for further development or want to completely overhaul your app’s branding. Unfortunately, the process of refactoring can get a bit complicated in Xcode 11, especially if you are using Cocoapods, additional libraries, or have several subfolders and schemas. In this short tutorial, I will explain how to comprehensively rename your Xcode project without breaking anything in 7 straightforward steps.
Step 1 — Renaming the project
- If you are using Cocoapods in your project, close the workspace, and open the XCode project to complete the following steps.
- Select the project you want to rename in the “Project Navigator” which can be found on the left side of the Xcode view.
- On the right-hand side of the window, select the “File Inspector”. The name of your project should be in there under “Identity and Type”, change it to “NEW” and press Enter.

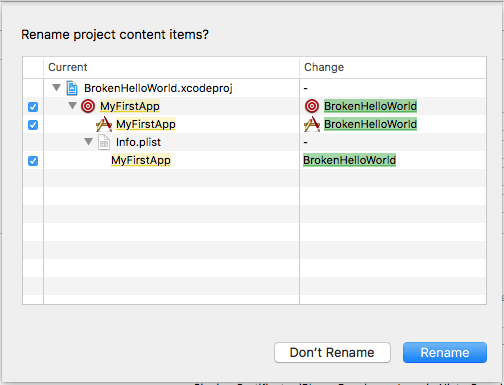
- A dialog will display, listing the items in your project that can be renamed. Confirm everything looks right and click “Rename”

Step 2- Renaming the schema
- In the top bar (near “Stop” button), there is a scheme with your “OLD” name, click on it, then go to “Manage Schemes”. Alternatively, you can find “Manage Schemes” here: Product > Scheme > Manage Schemes
- Click on the “OLD” name in the scheme, and it will become editable, change the name to “NEW”.
- Quit Xcode.
Step 4 — Renaming the folder with your assets
- Open your project folder and rename OLD.xcworkspace to NEW.xcworkspace.
- In the correct named master folder, there will be a newly named .xcodeproj file with…
